Chili
LOSE YOUR INSTRUCTION CARD?
Download a digital version of the Tomato Planter Instruction Card by clicking on the image below!

GROW ONE, GIVE ONE
Did you notice our Grow One, Give One campaign on your Planter? At Back to the Roots, we're a small, passionate team on a mission to reconnect families back to where food comes from. As part of that mission, for every Indoor Gardening Kit product you post a photo with, we'll donate the same product & a custom curriculum to an elementary school classroom of your choice! Learn more and send us your photo at BacktotheRoots.com/GiveOne
SETUP
Product Components
Jar
Why does it come in a glass jar?
expand_more
We use clear glass because it lets you watch the roots of the plant develop and see how moist your soil is for assessing your plant’s watering needs. The glass jar is also fully reusable and recyclable; after your final harvest you can compost the soil, wash the jar and use it for something else!
Can my pepper plant really grow in a small container?
expand_more
Yes it can! We created this planter with the proper seeds and soil blend to grow in this environment. Make sure to put your planter in a space with ample sunlight – one of the most important aspects of getting your plant to thrive!
Why does my jar lid have holes?
expand_more
It has holes to let the soil blend breathe before you use it. Plants love soil that contains air pockets, so the lid helps keep the soil ready to go while it’s waiting to become your garden.
What do I do with the lid after opening?
expand_more
The lid is made of aluminum and can easily be recycled just like a soda can, or can be upcycled into a dish or something else useful.
Soil
What is your soil made of?
expand_more
Our soil is a custom formulated blend of nutrient-rich ingredients such as up-cycled agricultural byproducts like coconut coir.
Is your soil organic?
expand_more
Yes! Our soil blend is made of 100% organic materials certified for use in organic gardening by OMRI, sourced from and blended in the United States.
Seed Packet
Are these seeds organic?
expand_more
- Yes! 100% organic, certified by EcoCert ICO
Are these seeds Non-GMO?
expand_more
Yes, all of our seeds are Non-GMO.
I think you gave me too many seeds.
expand_more
Those are our gift to you! Be sure to save them for a second planting or use them in another container to grow more peppers.
What kind of peppers are these?
expand_more
These are a candlelight chili pepper variety that will grow grow compact, bushy plants - making them an excellent variety for your planter! They have a mild level of spice.
Fertilizer Spikes
What are these for?
expand_more
Your planter comes with two fertilizer spikes to give your plant extra nutrients at important stages of plant growth. Insert one fertilizer spike into the soil when a) you see flowers b) when you see fruit. Refer to the Fertilizing FAQ for more information.
Are they Organic?
expand_more
Absolutely! 100% organic.
Placement
Where in my home should I put my planter?
expand_more
Your planter will do best in a south-facing window with full sun (8 hours per day). If you don’t have a window that gets lots of light, it may be best to use a grow light (available for purchase here). Learn more about how you find the perfect spot for your plant in our troubleshooting section.
What’s the best temperature for my planter to grow in?
expand_more
Your planter will grow well in normal room temperature (70-75 °F, 21-24 °C). Keep in mind that in higher temperatures, your planter will need more water to keep growing. Additionally, if temperatures are below 60 degrees most of the day, your seeds may be slow to germinate.
Planting
Should I water my soil first or plant my seeds first?
expand_more
First step is to dampen your soil with 1 cup of water before you begin planting you seeds. If you mixed up the steps, don’t worry! Just be sure that your seeds are covered in soil after the water has soaked in.
How many seeds do I need to plant?
expand_more
We recommend planting 4-6 seeds spaced evenly around the jar opening. If you planted the whole packet already, no problem. You may just have a few more seedlings to trim in the next couple of weeks.
My seed packet has more than 6 seeds - what do I do with them?
expand_more
Our seed packets always come with extra seeds for you to save for another planter of yours!
Why push the seeds ¼” (.6 cm) into the soil?
expand_more
Your seeds need a warm, moist environment to germinate, and the light ¼” blanket of soil is perfect for that. If left uncovered, the seeds may not be moist enough to sprout, but push them too far into the soil and they may never have the chance to peek their heads up. We’ve found that ¼” is the goldilocks of depths – not too shallow, not too deep, but just right!
How long is ¼” (.6 cm)?
expand_more
Use the width of your pinky nail as an estimate for ¼”.
What will happen to my seeds when they germinate?
expand_more
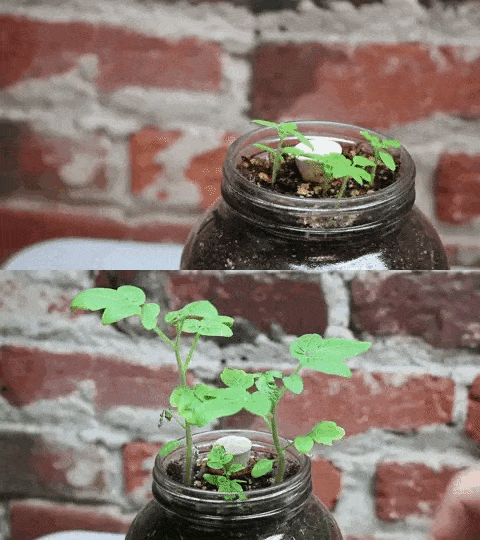
The germination process is the very beginning of your seeds turning into full plants. From Day 7 to Day 14 of growing you should start to see small seedlings appearing from underneath the soil and begin turning into sprouts.
My seeds are taking longer than 2 weeks to germinate
expand_more
Our seed packets state that seeds should germinate within 2 weeks. If that’s not the case for you it may be due to non ideal environmental conditions. If temperatures are below 60 degrees for most of the day or if your jar isn’t getting much light, your seeds may germinate slowly or not at all. This is why we’ve given you extra seeds! Try planting the leftover seeds for better luck. If none of these tips work for you, just give us a call; we’ll replace your seeds, or even your whole planter if needed, at no charge: (510) 922-9758.
Do I need to transplant my pepper plant into a larger container?
expand_more
No transplanting is necessary. Your pepper plant will have plenty of room to grow inside the jar. We actually recommend not transplanting your plant, as the roots may get damaged in the process.
ONGOING CARE
Watering
How much water do my chilis need?
expand_more
Depending on how warm your home is and how much direct light your planter gets, the time between waterings will vary. Peer through your mason jar to check the soil color - as it dries out it will turn a lighter shade of brown. That is your cue to add more water!
Additionally, when your seedlings are small, you will water less frequently than when your plant is larger - so stay vigilant and check your plant often!
When I initially watered my soil for set up, the water didn’t sink into the soil right away and there were lots of bubbles. Should I be concerned?
expand_more
Sometimes this happens because of air pockets throughout the soil or when soil gets dry in drier conditions. You can poke the top 1-2” of the soil with a fork to help get the water to soak through faster.
Thinning
How do I thin my plant?
expand_more
When 3" tall, plants should be thinned to 3 stems. First add a bit of water to the soil to soften. Next, carefully pull out stems by the part of the stem closest to the soil, being cautious to avoid disturbing other plants. When plants reach 5" tall, repeat the same process to thin to 1 plant.
Thinning to 3 stems after initial growth, and then thinning further to 2 stems once plants have grown a bit taller
Another method you can use is to cut the excess stems with scissors as close to the soil as possible. With this method, you may need to continually trim these stems to prevent them from regrowing – keep an eye out!
Will thinning hurt my plant?
expand_more
Nope! It helps the plant by reducing the competition between germinating sprouts for nutrients and soil space in the planter.
Why is thinning necessary?
expand_more
In order to have enough space for the roots to grow, and for the plant to grow into a healthy, mature plant to continually harvest from.
What happens if I forgot to thin my plants?
expand_more
You can still remove excess plants by trimming using the method mentioned above.
Fertilizing and Pollinating
What are the fertilizer spikes?
expand_more
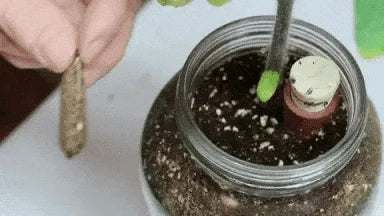
The spikes are made of organic growing material and provide extra nutrients for your plant in critical growth stages: flowering stage and fruiting stage. Learn more about the spikes from our partner, Jobe’s Organics.
When do I use the fertilizer spikes?
expand_more
We provide two for your planter. The first one should be inserted when flower blossoms have opened, and the second when fruits begin to appear. Insert them into the surface of the soil away from the main stem of the plant, about an inch deep - just like this:
What if I forgot to fertilize my plant right as it flowered?
expand_more
The exact timing of adding your fertilizer is not critical – just add the spike as instructed and your fruit should show up shortly!
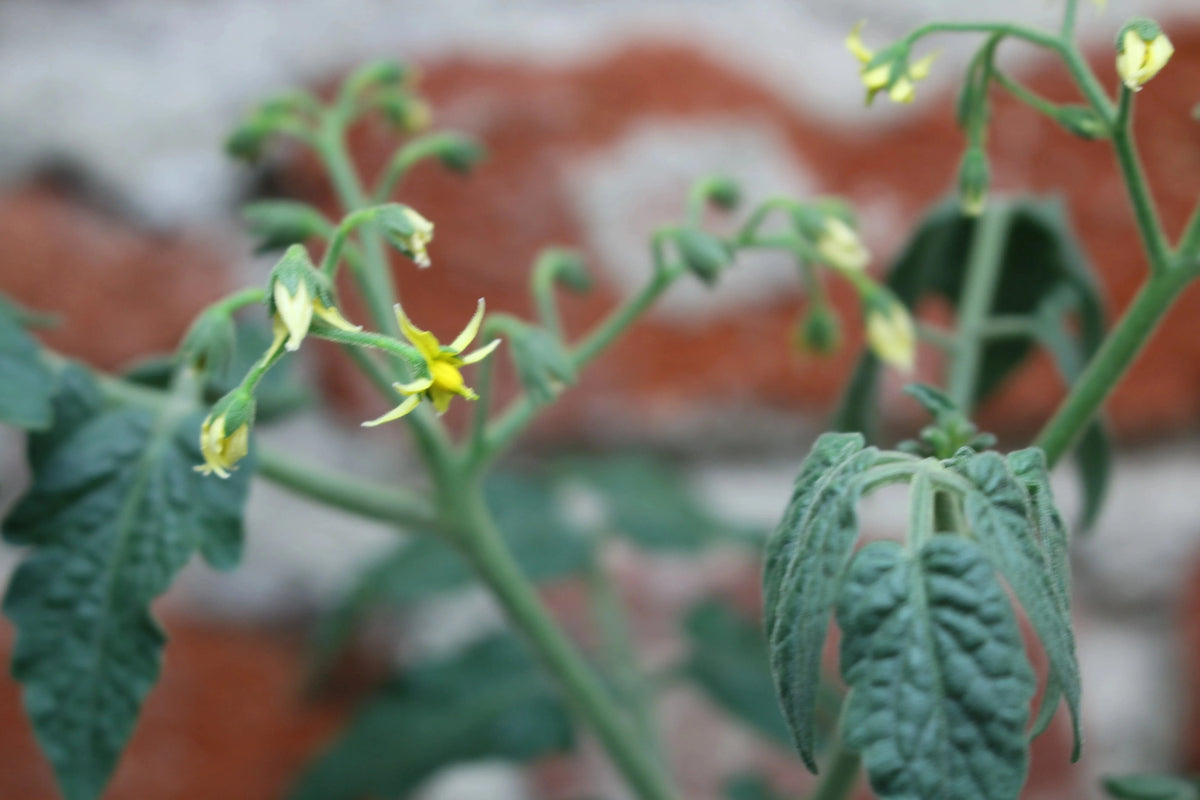
When is my plant ready to pollinate?
expand_more
When yellow or white flowers bud on your plant, your plant is ready to self-pollinate!
How do I help my plant to self-pollinate?
expand_more
After your plant’s flowers have opened, gently tap the base of your plant stems for 30 seconds to encourage self-pollination. To ensure pollination, do this at least twice on different days.
What is self-pollination?
expand_more
Certain plants, like your chili peppers, have the ability to self-pollinate. So instead of relying on bees or other pollinators to move pollen from flowers and promote fruit growth, the seed variety we provide grows flower blossoms that have both male and female parts. That’s why it’s important to tap the base of your plant stems, which will gently agitate the plant to move pollen where it needs to go to spur fruit!
Harvesting
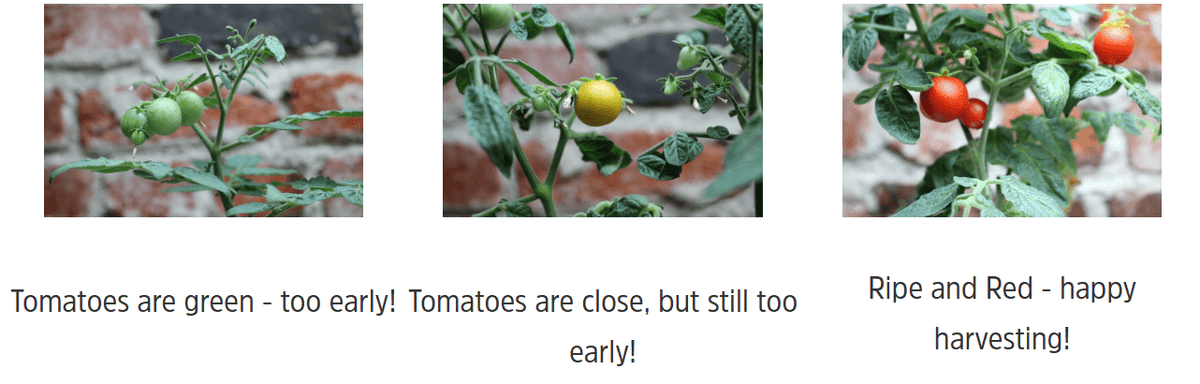
When should I harvest the fruits of my labor?
expand_more
Harvest times are going to vary based on growing conditions, but around three months into growing, narrow peppers will start to appear. At first they will be green - these peppers are edible, but we recommend waiting for the fruits to turn a fiery red before harvesting. This might take another week or two, so make sure to add your second fertilizer spike and await the peppers changing color.
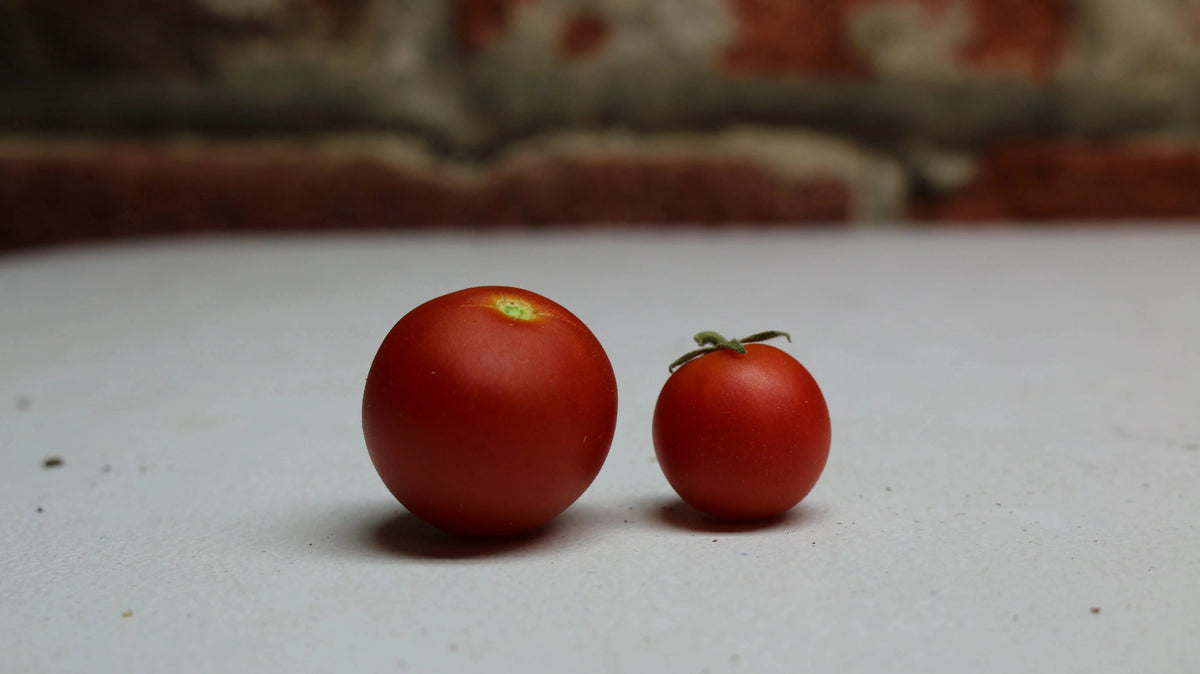
How big are my tomatoes supposed to be?
expand_more
Your tomatoes can vary in size, even on the same vine! In general, they grow to the size of grapes and will taste nice and sweet.
Two tomatoes plucked from the same vine.
Can I eat my peppers right away?
expand_more
Your peppers are good to add to any dish right away - just give them a good wash before eating!
How long will my peppers last after picking?
expand_more
After your harvest, your peppers can last a few weeks fresh. Store them in a cool place on your counter - not the fridge! Alternatively, you can dry your peppers and crumble them to make organic chili flakes that will last much longer.
What kind of meals can I create with these peppers?
expand_more
- These chili peppers go well as a spicy addition to any stir fry. Try substituting them into this spicy ginger stir fry sauce. Alternatively, you can dry your peppers to make organic chili flakes that can be sprinkled on pizza, pasta, or any delicious meal!
TROUBLESHOOTING
Find the Perfect Spot for your Chili Peppers
expand_more
Your planter will thrive in a spot in your home that gets 8+ hours of direct sunlight each day. Most of the time, this will be in a south-facing window - but why is that the case? What's the next best option if that isn't available? How can I tell if my sunlight is direct? All very valid questions! Let's start with the basics:
Why do I need to place my plant in a south-facing window?
expand_more
For those of us in the Northern Hemisphere, south-facing windows will receive the most direct sunlight throughout the day. Whether during the Summer or Winter months, the sun's daily path starts in the East, swings South, and then sets in the West. Placing your plants in south-facing windows will expose them to day-long sunshine and help them grow as strong as possible! Not sure which direction is south? Check your phone - most smart phones now include a digital compass app built in!
Note: if you live in the Southern Hemisphere, the sun's path - as well as your seasons - are mirrored, so north-facing windows are best for plant growth.
The sun travels East to West along a curved path that swings South. During the winter,
the sun appears lower in the sky, but south-facing windows still get plenty of direct light.

What should I do if I do not have a south-facing window?
expand_more
While east-facing and west-facing windows are your next best options, plant growth will be noticeably diminished without the full sun of a south-facing window. We recommend supplementing the natural light from a east- or west-facing window with a grow light. We sell one on our site here! Try your best to avoid placing your plants in a north-facing window, where natural light alone will not be enough to sustain growth. Check out the photo below - the plant on the right was grown in a south-facing window, while the one on the left was grown in a north-facing window. Huge difference, right!? In this situation, a grow light will drastically increase plant health and allow it to flourish., where natural light alone will not be enough to sustain growth. Check out the photo below - the plant on the right was grown in a south-facing window, while the one on the left was grown in a north-facing window. Huge difference, right!? In this situation, a grow light will drastically increase plant health and allow it to flourish.
A Tale of Two Windows - basil grown in a north-facing (left) and south-facing (right) environment.
Light is the most important determining factor in successful plant growth!

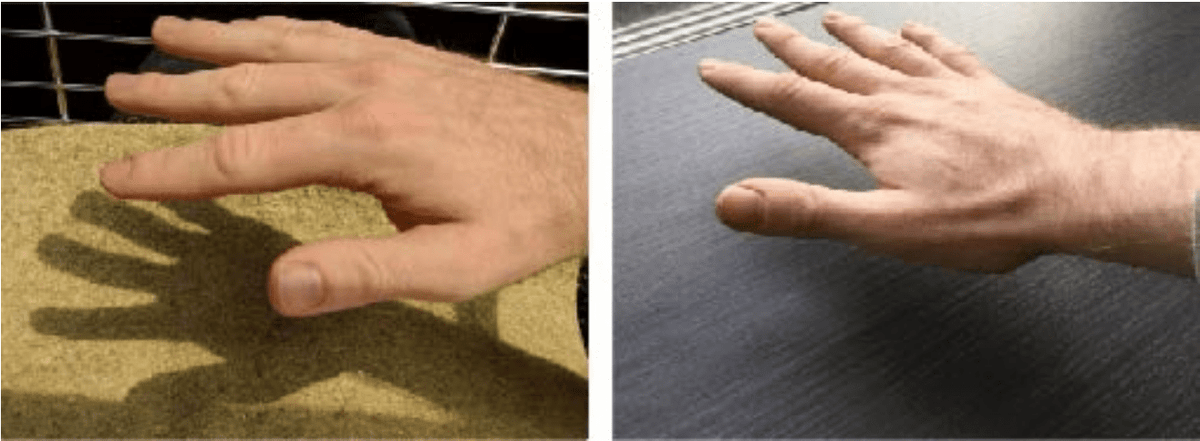
How do i determine how direct my light is?
expand_more
Short of purchasing a light meter, determining exactly how much light your plants will receive can be difficult. Fortunately, there's a low-tech way of measuring your light intensity with a 'shadow test'!
- Around mid-day, place your hand ~1ft above where your plant will sit and spread your fingers wide.
- Look at the shadow cast by your hand. A well-defined shadow means your light is strong, while fuzzier and fainter shadows mean you may need to supplement it with a grow light.
With your hand just above the proposed plant location, examine your shadow to determine if you have direct light (like the left image) or indirect light (on the right).
Leaves and Growth
The leaves on my plant are yellowing
expand_more
If this happens as the plants are producing fruit, it’s a sign that the soil’s nutrients are being redirected to the peppers for ripening. Feel free to snap off the yellow leaves from the plant.
Leaves yellow for a variety of reasons, but in this planter the most common reason is the amount of water the plant is getting. It seems confusing, but yellowing can be a result of too much or too little water! Check how damp your soil is and adjust your watering schedule so that the soil remains dark but doesn’t become waterlogged. If soil is a very light brown color and the leaves of your plant are droopy, it’s probably too dry. If your soil is very dark and wet looking, it’s probably too wet. Feel free to send us a picture and we’ll have our plant doctors will do your best to help you diagnose the problem!

The leaves on my plant are droopy
expand_more
This indicates that the plant is being under watered, and would appreciate a nice drink of water. A few hours after watering, you should notice that the leaves are perked back up.
My plant is small and hasn’t grown much since it first sprouted
expand_more
After the initial germination, the plant takes a while to grow to a full plant from which fruits can be harvested. This process can range from 2-3 months! Be patient and continue to ensure that its daily sunlight and water needs are met. Remember that your peppers like to be warmer – 70 to 75 °F (21-24 °C) during the day, with plenty of sun. Little sprouts don’t need too much water early on so unless they look particularly droopy and aren’t standing up straight, stay on the recommended watering schedule.
I have many little plants, but none that are growing very big
expand_more
You should thin to 2 plants so nutrients are concentrated and so that they can grow tall and strong. If you’ve already thinned your plant, just be patient! You may want to try changing the location of your planter so that it gets more sunlight.
Watering Concerns
What is the green stuff appearing in my soil, around the shoulders of the jar and the sides?
expand_more
The green stuff is algae, which thrives in moist environments while also having lots of direct sunlight. This isn’t detrimental to plant growth but if you want to reduce algal growth, place your planter where it can receive indirect sunlight for a few days or reduce watering to allow algae to recede.
I think I overwatered, what should I do?
expand_more
The best visual indicator of overwatering is when you tilt the jar to its side and see lots of water sloshing around. You can carefully invert the jar to help drain the water from the soil, and wait until the soil appears to be dry, a few days, before watering again.
Miscellaneous
Why does my jar lid have holes?
expand_more
It has holes to let the soil blend breathe before you use it. Plants love soil that contains air pockets, so the lid helps keep the soil ready to go while it’s waiting to become your garden.
What do I do with the lid after opening?
expand_more
The lid is made of aluminum and can easily be recycled just like a soda can, or can be upcycled into a dish or something else useful.
Can I replant something else in this jar?
expand_more
The soil in our planters contain just enough nutrients to provide one full growth cycle for your peppers, so we do not recommend replanting in the original soil. What you can do is empty the soil that’s leftover into a garden or compost bin, and reuse the jar with new soil and new seeds for a new plant!