
KIDS SCIENCE GROW KITS FREQUENTLY ASKED QUESTIONS
Instruction Booklet
Click the image below for a printable PDF of the instruction card.
Download
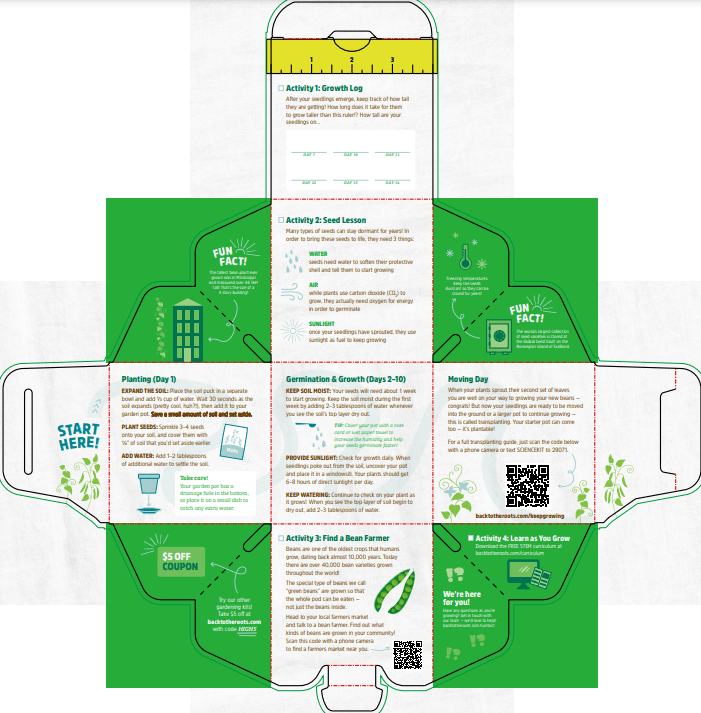
Bean Kids Science Grow Kit — box instructions and activities
Activity 1: Growth Log
After your seedlings emerge, keep track of how tall they are getting! How long does it take for them to grow taller than this ruler? How tall are your seedlings on Day 7, Day 10, Day 12, Day 14, Day 17, Day 20?
Activity 2: Seed Lesson
Many types of seeds can stay dormant for years! In order to bring these seeds to life, they need 3 things:
- Water: seeds need water to soften their protective shell and tell them to start growing.
- Air: while plants use carbon dioxide (CO₂) to grow, they actually need oxygen for energy in order to germinate.
- Sunlight: once your seedlings have sprouted, they use sunlight as fuel to keep growing.
Planting (Day 1)
Expand the soil: Place the soil puck in a separate bowl and add ½ cup of water. Wait 30 seconds as the soil expands (pretty cool, huh?!), then add it to your garden pot. Save a small amount of soil and set aside.
Plant seeds: Sprinkle 3–4 seeds onto your soil, and cover them with ¼" of soil that you'd set aside earlier.
Add water: Add 1–2 tablespoons of additional water to settle the soil.
Take care! Your garden pot has a drainage hole in the bottom, so place it on a small dish to catch any extra water.
Germination & Growth (Days 2–10)
Keep soil moist: Your seeds will need about 1 week to start growing. Keep the soil moist during the first week by adding 2–3 tablespoons of water whenever you see the soil's top layer dry out. Tip: Cover your pot with a note card or wet paper towel to increase the humidity and help your seeds germinate faster!
Provide sunlight: Check for growth daily. When seedlings poke out from the soil, uncover your pot and place it in a windowsill. Your plants should get 6–8 hours of direct sunlight per day.
Keep watering: Continue to check on your plant as it grows! When you see the top layer of soil begin to dry out, add 2–3 tablespoons of water.
Moving Day
When your plants sprout their second set of leaves you are well on your way to growing your new bean – congrats! But now your seedlings are ready to be moved into the ground or a larger pot to continue growing – this is called transplanting. Your starter pot can come too – it's plantable! For a full transplanting guide, just scan the code below with a phone camera or text SCIENCEKIT to 29071. backtotheroots.com/keepgrowing
Activity 3: Find a Bean Farmer
Beans are one of the oldest crops that humans grow, dating back almost 10,000 years. Today there are over 40,000 bean varieties grown throughout the world! The special type of beans we call "green beans" are grown so that the whole pod can be eaten – not just the beans inside.
Head to your local farmers market to see what kinds of bean are grown in your community. Scan this code with your phone camera to find a farmers market near you.
Activity 4: Learn as You Grow
Download the FREE STEM curriculum at backtotheroots.com/curriculum
We're here for you! Have any questions as you're growing? Get in touch with our team – we'd love to help! backtotheroots.com/contact
$5 OFF COUPON Try our other gardening kits! Take $5 off your first order at backtotheroots.com with code KIDS.
Fun facts about bean are printed on the box sides. Start here!
Download
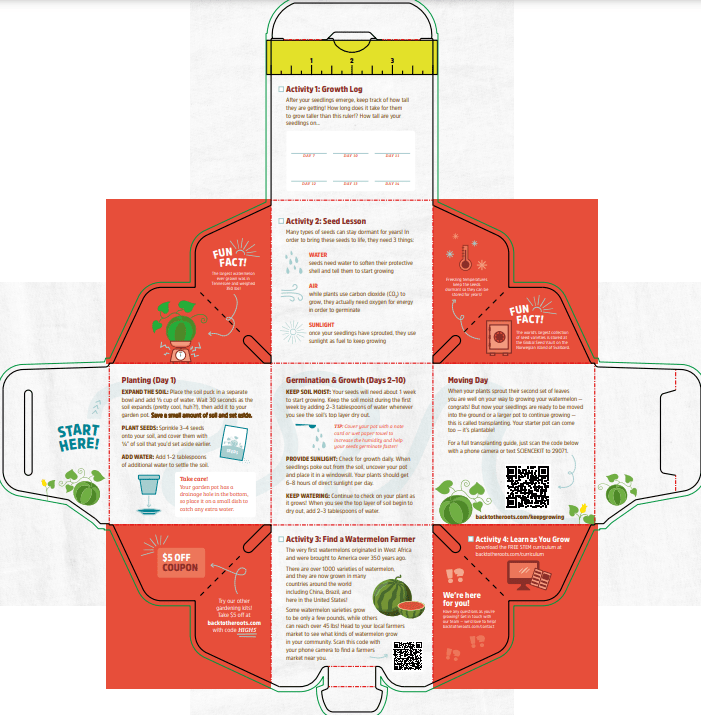
Watermelon Kids Science Grow Kit — box instructions and activities
Activity 1: Growth Log
After your seedlings emerge, keep track of how tall they are getting! How long does it take for them to grow taller than this ruler? How tall are your seedlings on Day 7, Day 10, Day 12, Day 14, Day 17, Day 20?
Activity 2: Seed Lesson
Many types of seeds can stay dormant for years! In order to bring these seeds to life, they need 3 things:
- Water: seeds need water to soften their protective shell and tell them to start growing.
- Air: while plants use carbon dioxide (CO₂) to grow, they actually need oxygen for energy in order to germinate.
- Sunlight: once your seedlings have sprouted, they use sunlight as fuel to keep growing.
Planting (Day 1)
Expand the soil: Place the soil puck in a separate bowl and add ½ cup of water. Wait 30 seconds as the soil expands (pretty cool, huh?!), then add it to your garden pot. Save a small amount of soil and set aside.
Plant seeds: Sprinkle 3–4 seeds onto your soil, and cover them with ¼" of soil that you'd set aside earlier.
Add water: Add 1–2 tablespoons of additional water to settle the soil.
Take care! Your garden pot has a drainage hole in the bottom, so place it on a small dish to catch any extra water.
Germination & Growth (Days 2–10)
Keep soil moist: Your seeds will need about 1 week to start growing. Keep the soil moist during the first week by adding 2–3 tablespoons of water whenever you see the soil's top layer dry out. Tip: Cover your pot with a note card or wet paper towel to increase the humidity and help your seeds germinate faster!
Provide sunlight: Check for growth daily. When seedlings poke out from the soil, uncover your pot and place it in a windowsill. Your plants should get 6–8 hours of direct sunlight per day.
Keep watering: Continue to check on your plant as it grows! When you see the top layer of soil begin to dry out, add 2–3 tablespoons of water.
Moving Day
When your plants sprout their second set of leaves you are well on your way to growing your new watermelon – congrats! But now your seedlings are ready to be moved into the ground or a larger pot to continue growing – this is called transplanting. Your starter pot can come too – it's plantable! For a full transplanting guide, just scan the code below with a phone camera or text SCIENCEKIT to 29071. backtotheroots.com/keepgrowing
Activity 3: Find a Watermelon Farmer
The very first watermelons originated in West Africa and were brought to America over 350 years ago. There are over 1000 varieties of watermelon, and they are now grown in many countries around the world including China, Brazil, and here in the United States! Some watermelon varieties grow to be only a few pounds, while others can reach over 45 lbs!
Head to your local farmers market to see what kinds of watermelon are grown in your community. Scan this code with your phone camera to find a farmers market near you.
Activity 4: Learn as You Grow
Download the FREE STEM curriculum at backtotheroots.com/curriculum
We're here for you! Have any questions as you're growing? Get in touch with our team – we'd love to help! backtotheroots.com/contact
$5 OFF COUPON Try our other gardening kits! Take $5 off your first order at backtotheroots.com with code KIDS.
Fun facts about watermelon are printed on the box sides. Start here!
Download
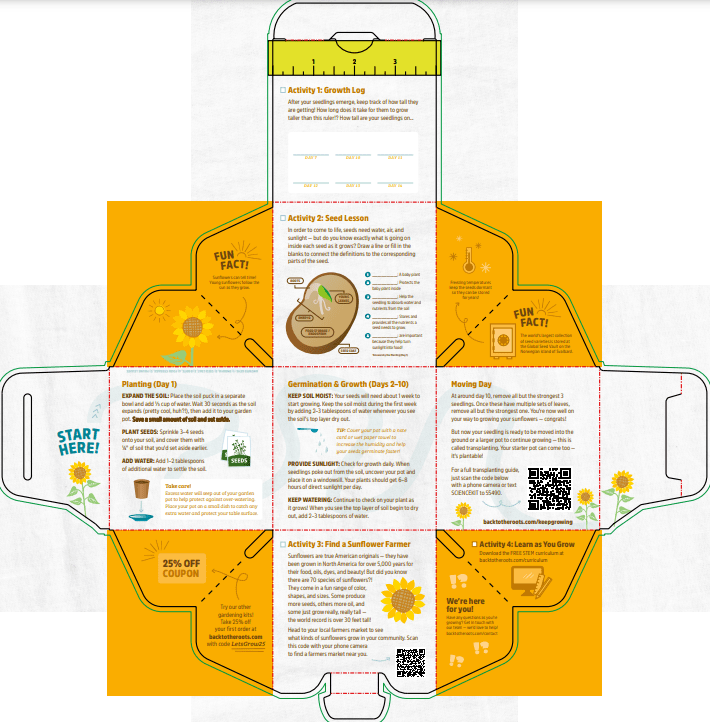
Sunflower Kids Science Grow Kit — box instructions and activities
Activity 1: Growth Log
After your seedlings emerge, keep track of how tall they are getting! How long does it take for them to grow taller than this ruler? How tall are your seedlings on Day 7, Day 10, Day 12, Day 14, Day 17, Day 20?
Activity 2: Seed Lesson
In order to come to life, seeds need water, air, and sunlight – but do you know exactly what is going on inside each seed as it grows? Draw a line or fill in the blanks to connect the definitions to the corresponding parts of the seed: baby plant, protects the seed, helps the seedling to absorb water and nutrients from the soil, stores and provides all the nutrients a seed needs to grow, germination (because they help turn sunlight into food).
Planting (Day 1)
Expand the soil: Place the soil puck in a separate bowl and add ½ cup of water. Wait 30 seconds as the soil expands (pretty cool, huh?!), then add it to your garden pot. Save a small amount of soil and set aside.
Plant seeds: Sprinkle 3–4 seeds onto your soil, and cover them with ¼" of soil that you'd set aside earlier.
Add water: Add 1–2 tablespoons of additional water to settle the soil.
Take care! Your garden pot has a drainage hole in the bottom, so place it on a small dish to catch any extra water.
Germination & Growth (Days 2–10)
Keep soil moist: Your seeds will need about 1 week to start growing. Keep the soil moist during the first week by adding 2–3 tablespoons of water whenever you see the soil's top layer dry out. Tip: Cover your pot with a note card or wet paper towel to increase the humidity and help your seeds germinate faster!
Provide sunlight: Check for growth daily. When seedlings poke out from the soil, uncover your pot and place it in a windowsill. Your plants should get 6–8 hours of direct sunlight per day.
Keep watering: Continue to check on your plant as it grows! When you see the top layer of soil begin to dry out, add 2–3 tablespoons of water.
Moving Day
When your plants sprout their second set of leaves you are well on your way to growing your new sunflower – congrats! But now your seedlings are ready to be moved into the ground or a larger pot to continue growing – this is called transplanting. Your starter pot can come too – it's plantable! For a full transplanting guide, just scan the code below with a phone camera or text SCIENCEKIT to 29071. backtotheroots.com/keepgrowing
Activity 3: Find a Sunflower Farmer
Sunflowers are true American originals – they have been grown in North America for over 5,000 years for their food, oils, dyes, and beauty! But did you know there are over 70 species of sunflowers?! They come in a fun range of color, shapes, and sizes. Some produce more seeds, others more oil, and some just grow really, really tall – the world record is over 30 feet tall!
Head to your local farmers market to see what kinds of sunflower are grown in your community. Scan this code with your phone camera to find a farmers market near you.
Activity 4: Learn as You Grow
Download the FREE STEM curriculum at backtotheroots.com/curriculum
We're here for you! Have any questions as you're growing? Get in touch with our team – we'd love to help! backtotheroots.com/contact
25% OFF COUPON Try our other gardening kits! Take 25% off your first order at backtotheroots.com with code LetsGrow25.
Fun facts about sunflower are printed on the box sides. Start here!
Download
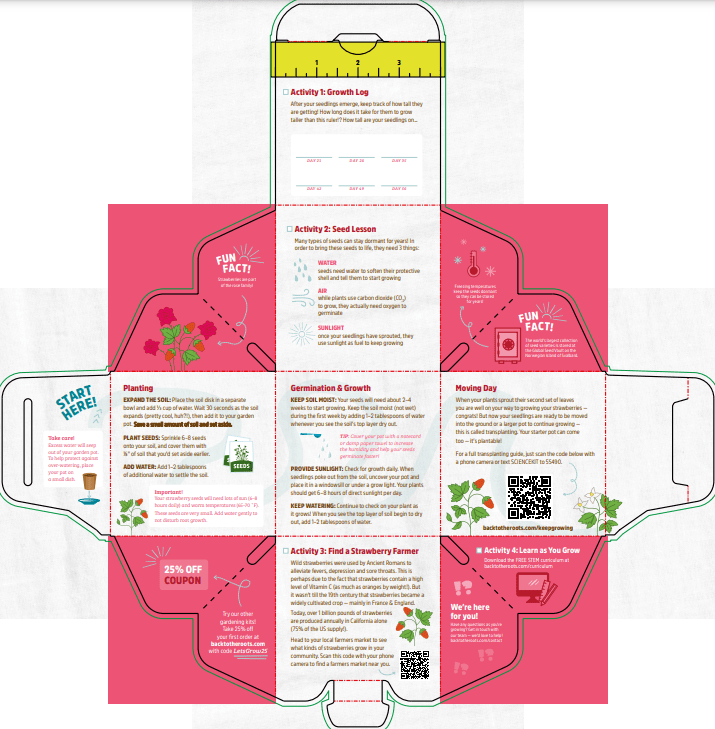
Strawberry Kids Science Grow Kit — box instructions and activities
Activity 1: Growth Log
After your seedlings emerge, keep track of how tall they are getting! How long does it take for them to grow taller than this ruler? How tall are your seedlings on Day 7, Day 10, Day 12, Day 14, Day 17, Day 20?
Activity 2: Seed Lesson
Many types of seeds can stay dormant for years! In order to bring these seeds to life, they need 3 things:
- Water: seeds need water to soften their protective shell and tell them to start growing.
- Air: while plants use carbon dioxide (CO₂) to grow, they actually need oxygen for energy in order to germinate.
- Sunlight: once your seedlings have sprouted, they use sunlight as fuel to keep growing.
Planting (Day 1)
Expand the soil: Place the soil puck in a separate bowl and add ½ cup of water. Wait 30 seconds as the soil expands (pretty cool, huh?!), then add it to your garden pot. Save a small amount of soil and set aside.
Plant seeds: Sprinkle 6–8 seeds onto your soil, and cover them with ¼" of soil that you'd set aside earlier.
Add water: Add 1–2 tablespoons of additional water to settle the soil.
Take care! Your garden pot has a drainage hole in the bottom, so place it on a small dish to catch any extra water.
Important! Your strawberry seeds will need lots of sun (6–8 hours daily) and warm temperatures (65–70 °F). These seeds are very small. Add water gently so as not to disturb their growth.
Germination & Growth (Days 2–10)
Keep soil moist: Your seeds will need about 1 week to start growing. Keep the soil moist during the first week by adding 2–3 tablespoons of water whenever you see the soil's top layer dry out. Tip: Cover your pot with a note card or wet paper towel to increase the humidity and help your seeds germinate faster!
Provide sunlight: Check for growth daily. When seedlings poke out from the soil, uncover your pot and place it in a windowsill. Your plants should get 6–8 hours of direct sunlight per day.
Keep watering: Continue to check on your plant as it grows! When you see the top layer of soil begin to dry out, add 2–3 tablespoons of water.
Moving Day
When your plants sprout their second set of leaves you are well on your way to growing your new strawberry – congrats! But now your seedlings are ready to be moved into the ground or a larger pot to continue growing – this is called transplanting. Your starter pot can come too – it's plantable! For a full transplanting guide, just scan the code below with a phone camera or text SCIENCEKIT to 29071. backtotheroots.com/keepgrowing
Activity 3: Find a Strawberry Farmer
Wild strawberries were used by Ancient Romans to alleviate fevers, depression and sore throats. This is perhaps due to the fact that strawberries contain a high level of Vitamin C (as much as oranges by weight!). But it wasn't till the 19th century that strawberries became a widely cultivated crop – mainly in France & England. Today, over 1 billion pounds of strawberries are produced annually in California alone (75% of the US supply!).
Head to your local farmers market to see what kinds of strawberry are grown in your community. Scan this code with your phone camera to find a farmers market near you.
Activity 4: Learn as You Grow
Download the FREE STEM curriculum at backtotheroots.com/curriculum
We're here for you! Have any questions as you're growing? Get in touch with our team – we'd love to help! backtotheroots.com/contact
25% OFF COUPON Try our other gardening kits! Take 25% off your first order at backtotheroots.com with code LetsGrow25.
Fun facts about strawberry are printed on the box sides. Start here!
Have a question that’s not answered here? Reach out to our knowledgeable customer service team and they’ll be happy to help you out!
Setup Questions
How do I expand my soil puck?
expand_more
Place your soil puck into a separate bowl and add ⅓ cup of warm water. Let it stand for 30 seconds as it absorbs water and expands. If you notice dry or unexpanded parts, add more water in 1 Tbsp increments until everything is moist and expanded.
Growth and Care Questions
How much water should I be adding to my plants?
expand_more
How much water you add to your plants depends on what point in the grow cycle you’re at:
While your seeds are germinating, keep the soil moist by adding 2-3 Tablespoons of water whenever you start to see the soil dry out (it will get lighter in color). Keep your pot covered to help the soil retain moisture while you wait for seeds to sprout.
After your seedlings have sprouted, uncover your pot and continue to add 2-3 tablespoons of water as you see the soil begin to dry. This should be enough water to saturate the soil and have a bit run out of the bottom drainage hole.
Still unsure if your soil needs water? Use your finger to poke around the soil surface, and if the top ¼ inch is dry to the touch go ahead and add water.
How much light do my plants need to grow?
expand_more
After your seedlings have sprouted, they should receive 6-8 hours of direct sunlight each day. A south-facing window in your home is a great location for this.
How can I tell my plants are ready to transplant?
expand_more
When your plants sprout their second set of leaves, you’re ready to transplant them into your garden! Usually this happens right around 2 weeks after planting, but can take up to 3 weeks sometimes.
How do I add my plants to the garden?
expand_more
Our eco-friendly plantable garden pots make it easy to add your seedlings to your garden. Follow our step-by-step transplanting guide to make sure your plants continue to thrive!
Component-related Questions
What is the soil puck made of and how do you get it so small?
expand_more
The soil disc is made from 100% organic coconut coir. Coir is the fibrous husk on the outside of coconuts, and it’s one of the most common grow media for gardeners all around the world! These discs are made by compacting coir together as it dries, so it takes up very little space and is very light. When you add water to rehydrate the coconut coir, it expands back to full size!
What is the garden pot made of?
expand_more
The compostable and plantable garden pot is made of 100% recycled cardboard plus a proprietary bio-based additive that helps the paper repel moisture. The additive is 100% natural - think of it as “plugging the tiny holes” in the surface of the cardboard. This keeps the pot strong while your seedlings are young, but then allows the pot to break down and compost after you transplant it into your garden!
Have a question that’s not answered here? Reach out to our knowledgeable customer service team and they’ll be happy to help you out!